
February, 2010. Sometimes I work in the garage in the cold weather, but only briefly. I have tried taking the chill off with a 5000-watt electric heater. It helps, but not much. It is still very cold in the garage in the winter. I have decided to install a small wood stove. I managed to catch this little Vogelzang boxwood stove on sale at Harbor Freight:

I quickly found that the stove is a small part of the total expense of installing a wood stove. Stove pipe is cheap, but class-A chimney pipe is expensive. After much research, I found the cheapest prices for chimney parts at Lowe's. They sell the Selkirk brand called Supervent.
Black stove pipe will go from the stove up to the ceiling, then chimney pipe will go through the ceiling, through the attic, and through the roof. According to the National Fire Protection Association, the chimney must extend a minimum of 3 feet above the roof at the highest exit point. The top of the chimney must be at least 2 feet above the peak. Here is a figure borrowed from the installation guide showing the chimney details:

A chimney kit from Lowe's includes all the parts in the figure except the Chimney Sections.
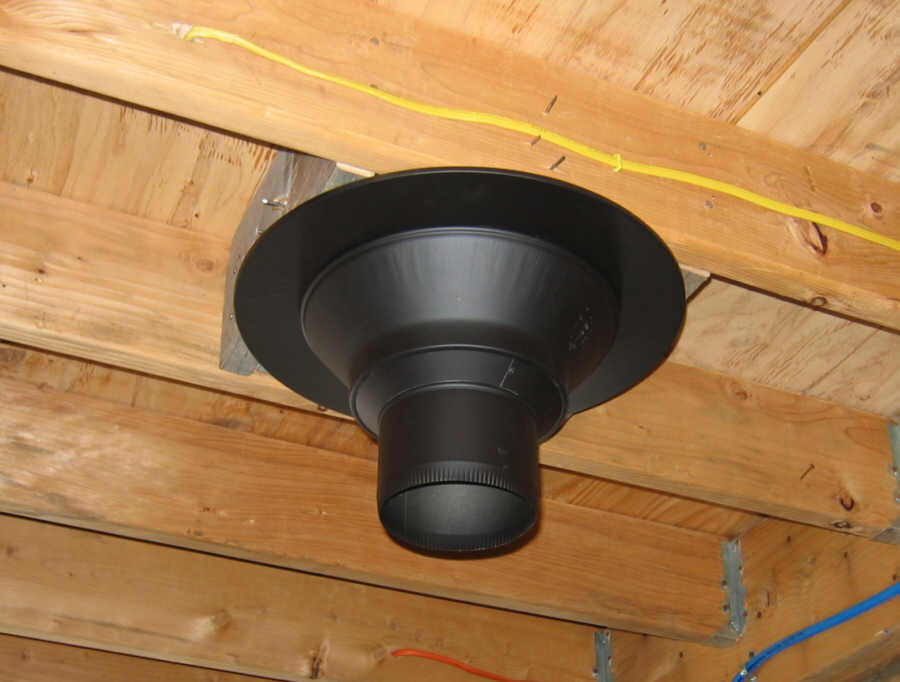
February 10, 2010. After choosing the location for the stove, I used a plumb bob to define the center of a 12 3/8" circle between two ceiling joists. I drilled a small hole at this point (circled):

Shown here is also the rerouting of the yellow Romex wire to an overhead outlet.
Upstairs, I drew a 12 3/8" diameter circle with the hole in the center:

Before cutting out the circle, I used a plumb bob to find the center of a point on the attic ceiling where the chimney will go:

I marked the ceiling where I will cut out the OSB panel:

I cut out the panel with the little Ryobi circular saw, like when I cut out the window holes in the garage:

I cut out the insulation and soffit vent:

Then I cut out the circle on the second floor:

February 11. I framed the hole in the ceiling with pieces of 2x8. The ceiling joists and the roof rafters are offset by one joist width, so I positioned this hole against one joist. The roof hole will be against the rafter on the opposite side:

I secured the chimney support with a few nails through four straps into the framed opening:

Then I went upstairs and put more nails in:

The stove pipe adapter goes in through the top, sticks out the bottom:
The chimney pipe screws into this adapter. Here is the first piece coming off the second floor, surrounded by the attic insulation shield. This shield has a telescoping section that drops into the hole thus shielding the wood frame from the chimney heat:

February 13. I assembled stove pipe pieces. The pipe comes in a rolled sheet with crimped edges:

One edge is inserted into the other until the edges snap together. Here are two 2-foot sections fitted together:

I needed three 2-foot sections plus an 8-inch piece at the bottom. I cut the bottom piece with my angle cutter from the smooth end of a pipe sheet. The pieces are screwed together using three sheet metal screws at each joint:

February 15. I cut a piece of 2x10 at the roof angle to frame the roof hole:

The cut piece is plumb, toe-nailed into the rafter:

I cut another piece for the top of the hole. I'll nail these in after I cut the hole in the roof, to make sure everything lines up right.
February 20. There is still 5 to 6 inches of snow and ice on east roof. I need to clean off a strip so I can cut the roof hole. First I used a snow shovel, then a push broom. Then to reach farther up the roof, I made a simple snow removal tool with a piece of scrap metal and a 12 foot length of PVC conduit:

Most of the snow removed:

I let the sun melt the traces of snow and ice. In the afternoon, I threw a rope over the roof and climbed up. Using a snow shovel I removed the snow at the top of the strip:

February 22. I cut a hole in the roof. First I drilled some 5/8" holes with a spade bit:

Then I cut a half moon from the inside with the reciprocating saw:

Then put the saw through the hole, climbed up the roof and finished cutting up there. The snow is great for holding things like the flashing and the caulking gun:

I had my son send a chimney piece up to me. I fit the flashing over the chimney and marked the position of the roof to get a plumb chimney. Then I came back in and nailed in the framing. Here is the framed hole in the roof:

Nice straight, plumb chimney going into the hole, at least 2" of clearance on all sides, as required by fire code:

Chimney up, with flashing, storm collar and rain cap:

The stove needs a grate to burn wood efficiently. I cut, bent and welded an old BBQ warming grate to do the job:

February 22. I climbed up the roof to measure the chimney height. It needs to be exactly one foot higher for the cap to be 2 feet above the peak, as I suspected. I can buy a one foot chimney section and screw it on. Nearly done.
February 24. I got a one foot section of chimney. I disconnected the rain cap and storm collar, then I installed the one foot section in the attic. I installed safety locking bands to secure the chimney sections together. You can see two bands around the one foot section:

Then I climbed up the roof one last time, to reinstall the rain cap and storm collar. This time, I put a bead of "metallic" silicone sealant between the storm collar and the chimney:

All I need to do is clean up!
February 25. Fire in the stove: